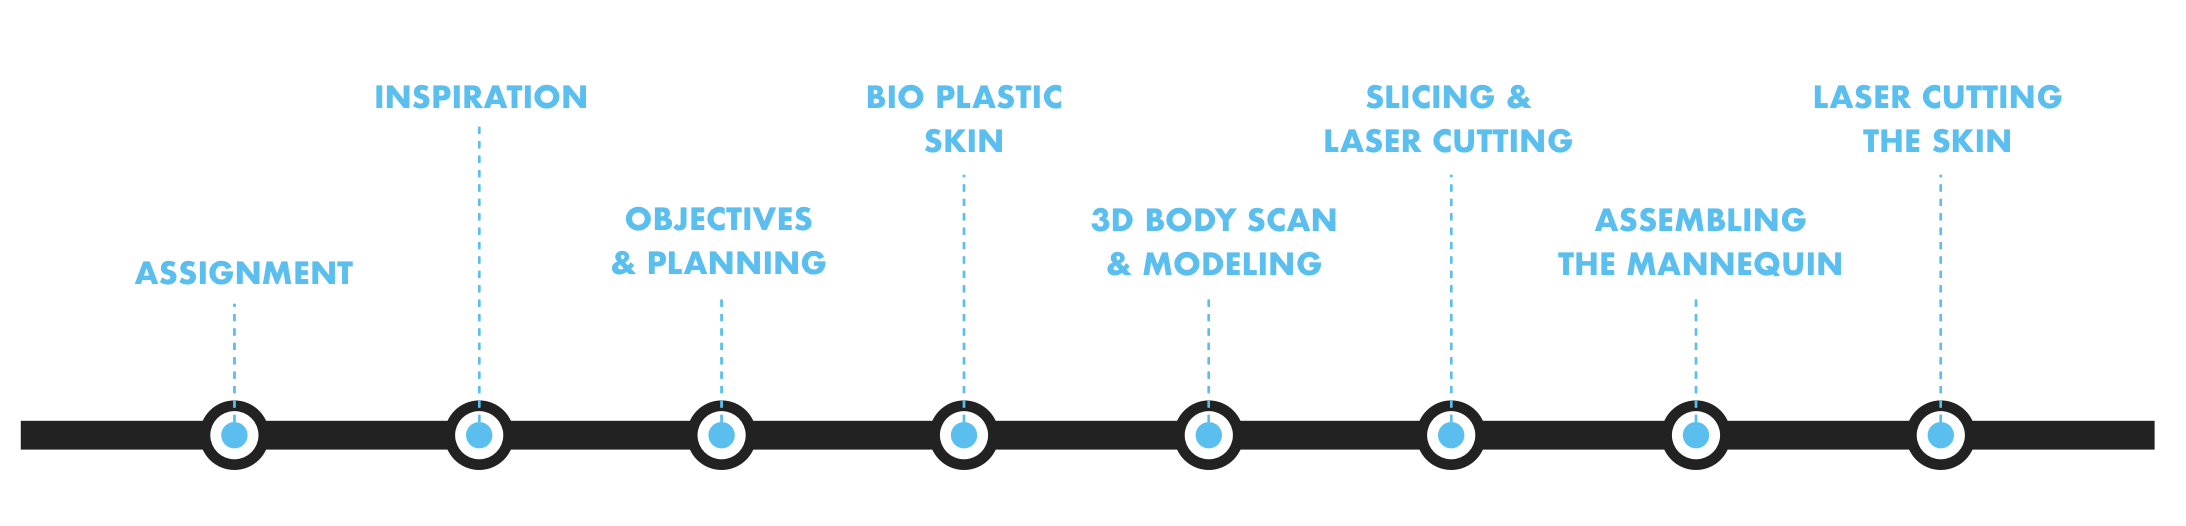
ASSIGNMENT
For the assignment we had to use software to obtain a body-figure and choose a digital fabrication process to produce a mannequin. The assignment would be evaluated on the documentation of the entire process, from using a 3D scanner to acquire a model, to repairing the 3D model mesh, to choosing the preferred combination of milling, laser cutting, vacuum forming and composites, assemblage of the mannequin and link to files.
INSPIRATION
I researched different Mannequin ideas online and posted the images on a dedicated Pinterest board, called Mannequins & Skin Surfaces - you can find the board here
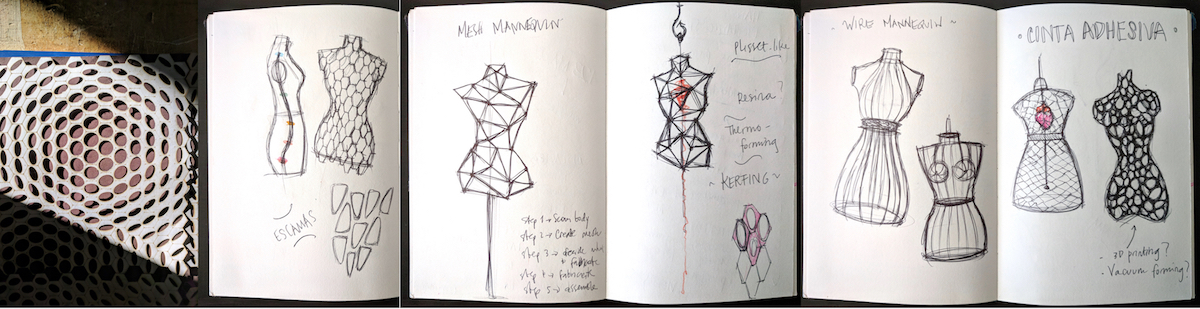
I then sketched different possible mannequin ideas as a visual brainstorm + photographed a few inspiring objects and surfaces inside Fablab Yucatan (see photos)
OBJECTIVES & PLAN
The objective is to create a mannequin with a waffle scaffolding made in laser cut MDF and a flexible skin made in bioplastic. The design of the skin will be created with a Grasshopper function called “Attractor Points”, hexagons with ellipses inside them.
Thursday
- Prepare the bioplastic recipe
- Lay it out on in a basin big enough to fit the laser cutter (60cmx90cm)
- Let it cure for 4 days, so it will be ready to cut on Monday
- 3D Scan my torso with the Kinect
- Bring the 3D scan into SKanect, a program to create the 3D mesh model
- Clean the mesh with Mesh Mixer, Blender or Mesh Lab
- Import the clean mesh in Slicer for 360 Fusion and create the waffle structure
Friday
- Laser cut torso slices and start assembling them
- Learn Grasshopper Attractor Point function
- Start the design for the skin
- Check on the Bioplastic skin
Saturday
- Assemble the laser cut mannequin
- Document my work on Fabricademy wiki
Monday
- Finish design for bioplastic skin
- Laser cut on bioplastic skin


BIO PLASTIC SKIN
Thursday, together with Sara we created the frames to contain the bioplastic that will be the “skin” of the mannequin I am making.
We made two frames from the material to make architectural models and wood. That included cutting wood with a circular saw, hammering the wooden sticks to the foam in order to create a container for the bioplastic with nails and then creating the recipe for the bioplastic twice and putting it in the containers.
We made the recipe twice, based on Clara Davis' recipe tutorial that Sara already used for her laser cut bag.
ORIGINAL RECIPE
- 240 ml cold water
- 48 g gelatin powder
- 12 g glycerol
RECIPE 1 - MULTIPLIED ORIGINAL x4
- 1000 ml cold water
- 192 g gelatin powder
- 48 g glycerol
The first attempt had too little liquid for the surface we planned to cover, and in addition to that the liquid kind of grouped all in the center. The surface tended to deform, so for the future I plan to use a more flat surface, less prone to deformation. In order to contain the deformation, we used pieces of scrap wood to sustain the surface and keep it more flat.
RECIPE 2 - MULTIPLIED ORIGINAL x6
- 1440 ml cold water
- 288 g gelatin powder
- 72 g glycerol
The gelatin was not enough for the second batch, so Oscar had to go buy some more. He found a pack for 80 MXN, vs another store that sold it for 280 MXN.
We made the second recipe multiplying it by 6, and this time the amount felt just right. We decided to leave the foam in order to give the bioplastic sheet a “marble” effect. This time the surface was flatter, as we placed the wooden supports in advance, before pouring the liquid. The bioplastic skin stayed to cure until Monday (4 days)
3D Body Scan & Modeling


Interface of the Skanect after my body scan.
After making the bio plastic, we created a 3D body scan of my body with the Microsoft Kinect, and the software Skanect (trial version). The Kinect reads color with its camera and reads depth with the infrared sensor. The Skanect transforms the Kinect into a low cost 3D scanner, able to create 3D scans out of real scenes in a few minutes.
In order to scan my body, Oscar and Alex circumnavigated me as I stood still with my arms open like a cross, Oscar holding the Kinect and the other guy holding my computer to click on the picture with Skanect. Here you can find a tutorial showing how to scan with Kinect + Skanect.
Afterwords we saved the file in .stl (stereolitography) and I downloaded Mesh Mixer to refine the mesh and close the holes. Mesh Mixer is a free 3D modeling program provided by Autodesk, and it calls itself the state of the art software to all work with triangle meshes. I really enjoyed learning how to use Mesh Mixer and managed to smoothen the mesh and close all the holes using the the sculpt , analyze & transform commands.
The learning curve is not very steep, only a couple hours. I watched this and this tutorial on Youtube to familiarize with the program.

With the tool Brushes I smoothened the the mannequin mesh, making it nicer. I used Flatten, BubbleSmooth, ShrinkSmooth

I used the command Close Cracks to make sure the mesh was closed.
SLICING & LASER CUTTING
After completing the 3D model, I downloaded another free program, Slicer for Fusion 360, to create the slices for the waffle structure of the mannequin. This Autodesk program can be used standalone without Fusion 360 to create slices of 3D models made on other programs. I exported my 3D model from Mesh Mixer in .stl and opened it in Slicer for Fusion 360. I had some issues saving the model in such a way that it would be in the correct vertical position, but ultimately I made it :)


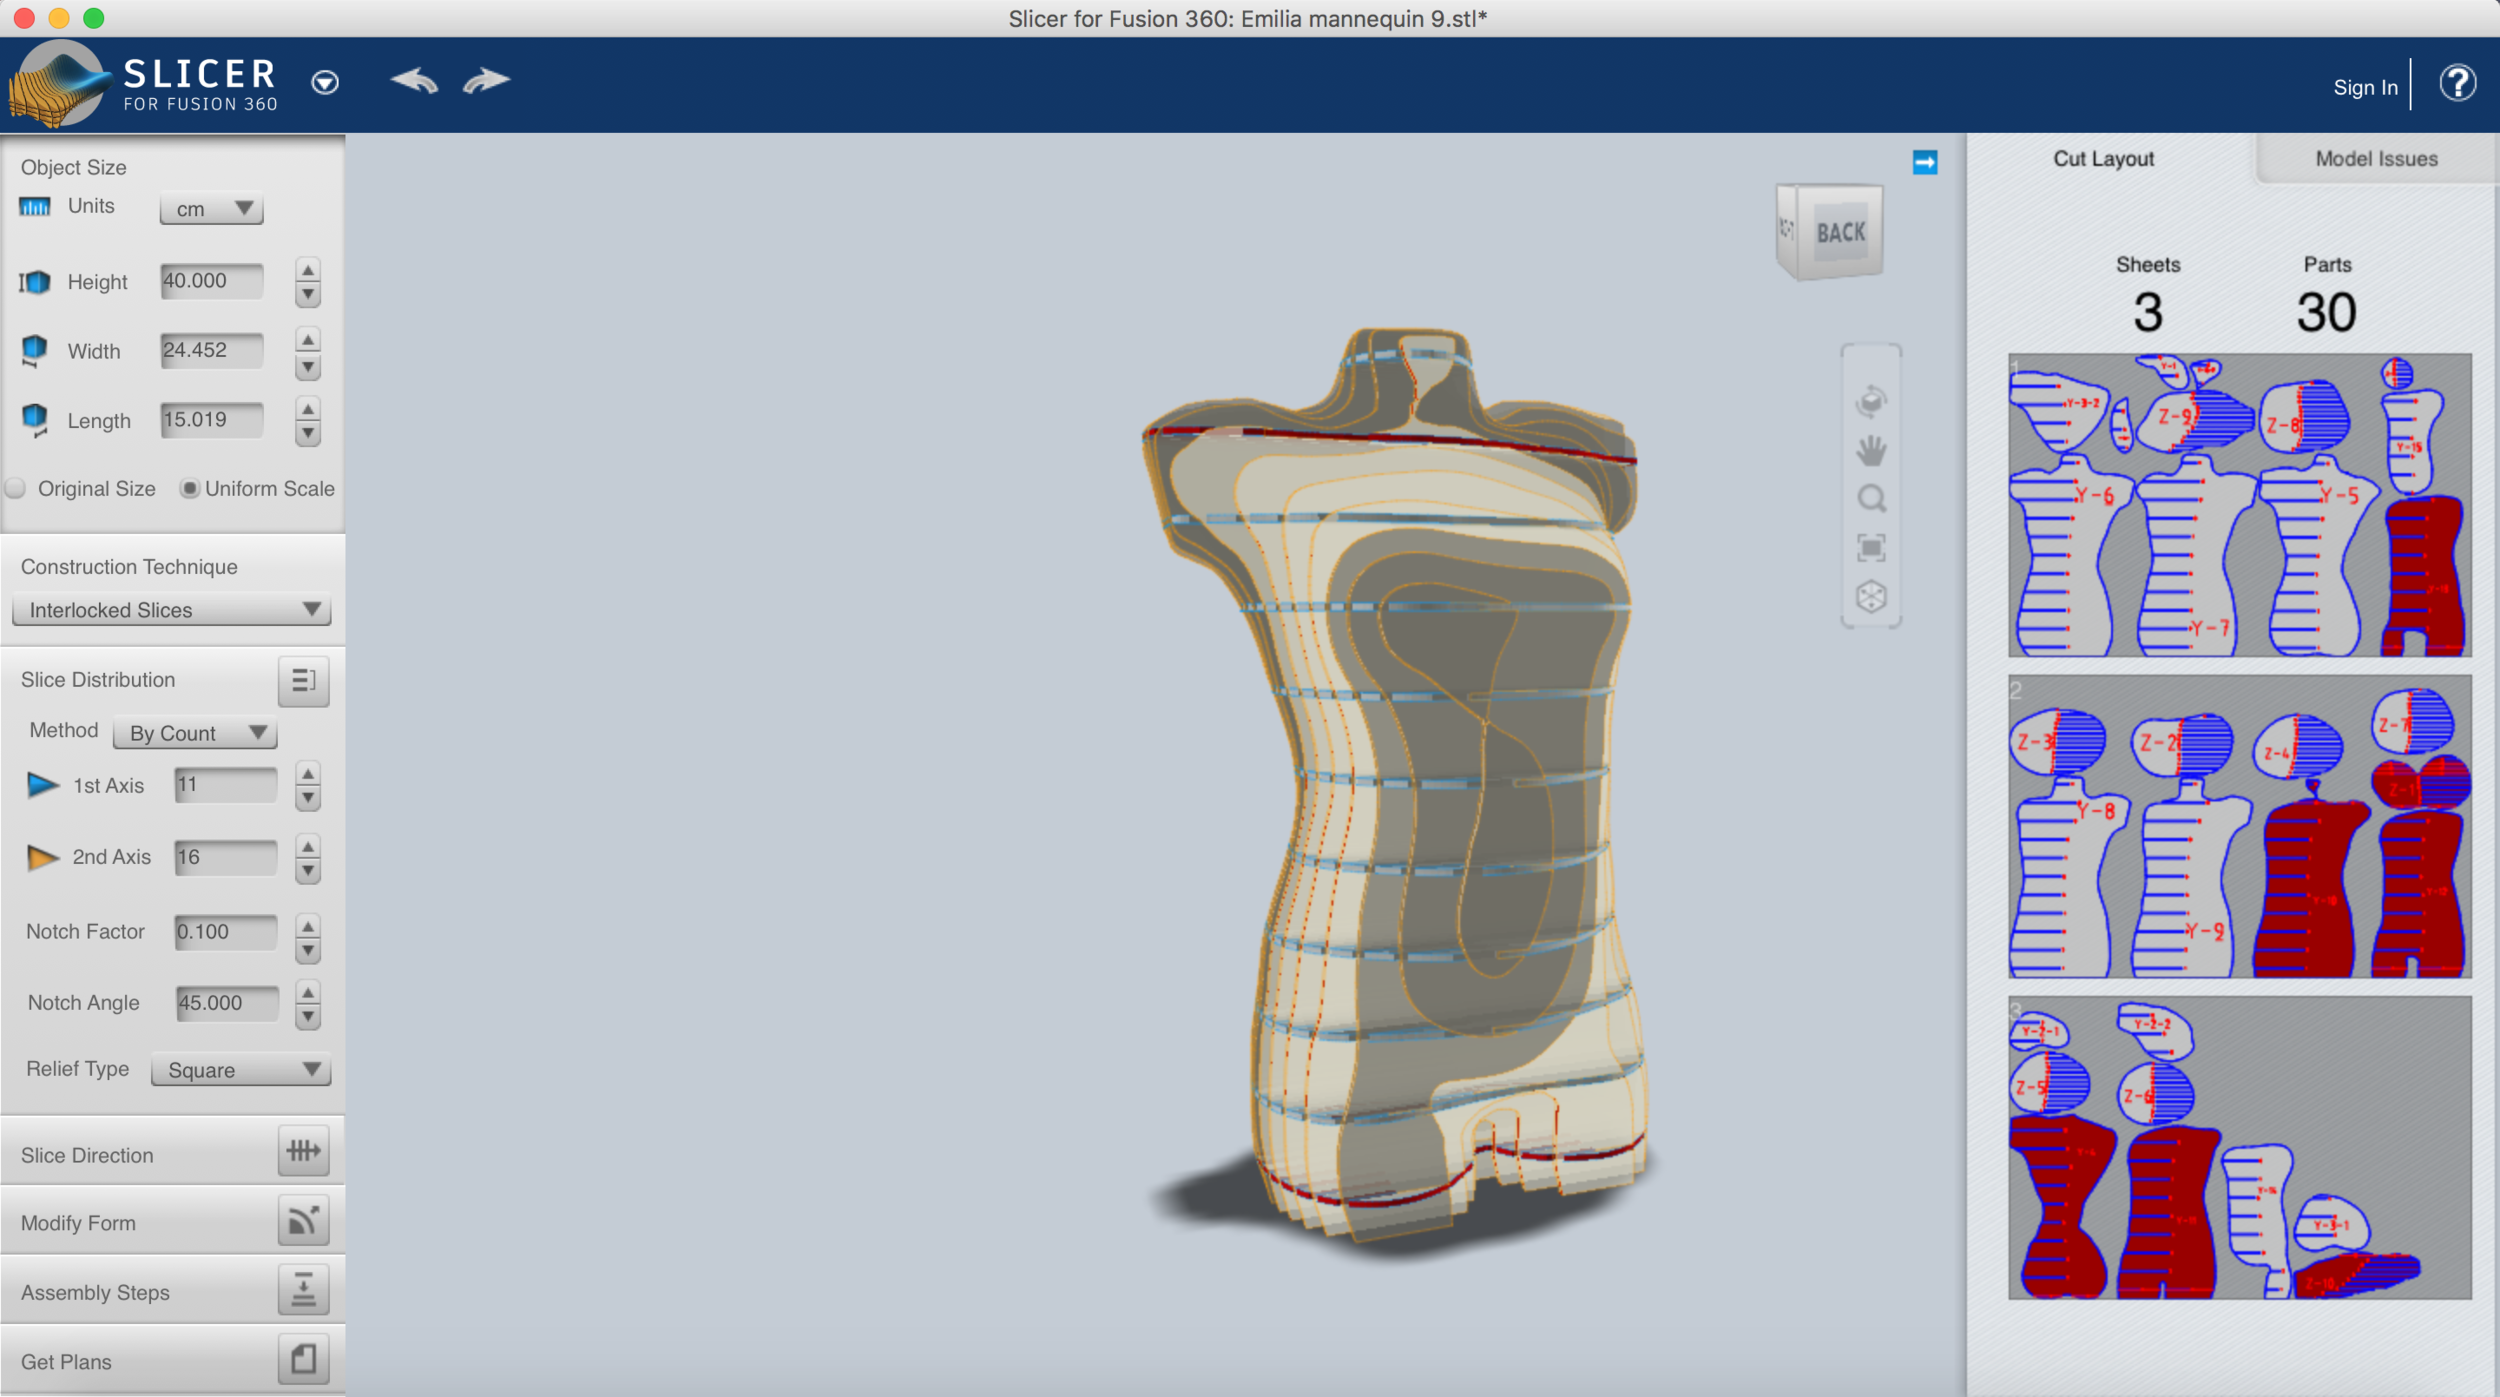
I decided to create a radial waffle structure, as it looked more interesting than the “normal” stacked or interlocked slices. I went for 11 horizontal slices and 15 vertical slices, which seem to allow the design of a mannequin that will look accurate enough without excessive weight and material usage. We used MDF 3 mm thick to cut the slices.

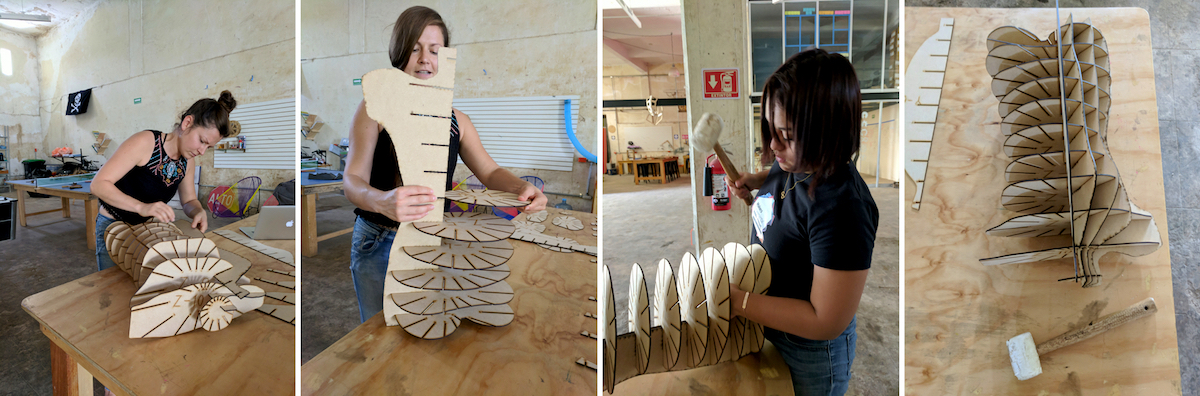
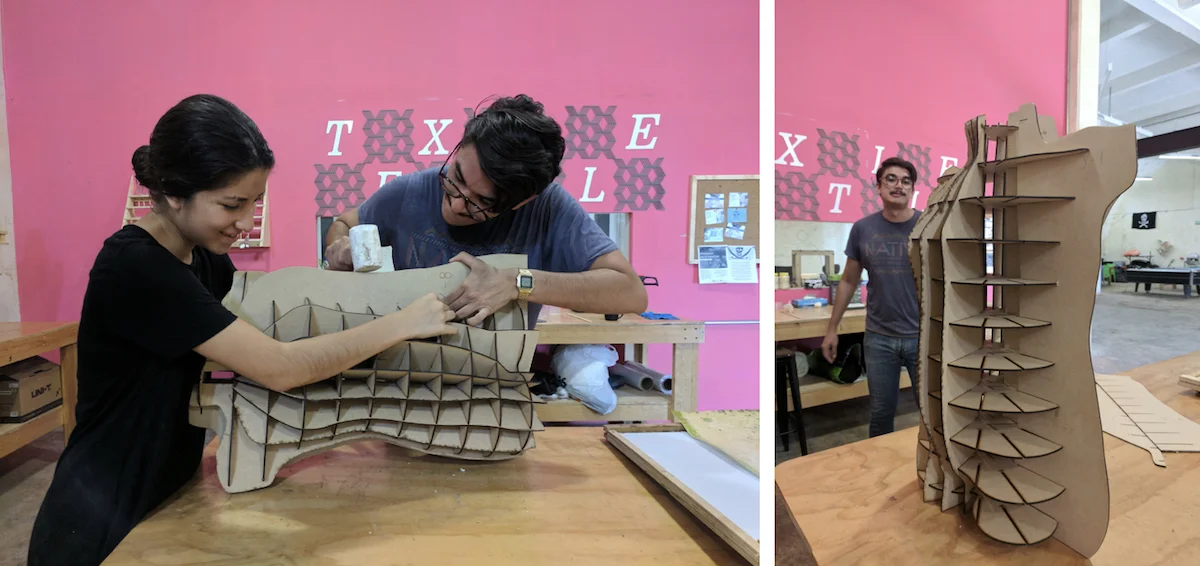
Assembling Slices
Together with Lisa, on Saturday I started assembling the MDF mannequin.
In total, it has 11 horizontal slices and 15 vertical slices.
The challenge Lisa and I found regards two main issues:
The MDF doesn't slide very easily, making it hard to assemble the slices
The radial structure of the waffle strucutre makes the sliding even harder due to the inability to exploit the perpendicularity between slices when using force
Since the slices were stuggling to slide in, we used a hammer with a rubber head to push them in. This is a bit dangerous since the MDF can break. Indeed a few slices of the neck did break :(
TROUBLESHOOTING
On Monday, we finished assembling my Mannequin. Together with Oscar, we discussed how to solve the issue I encountered with Linda on Saturday about the difficulty in sliding the MDF slices one into the other. Our solution is the following: we sanded the interlocking slots just a bit in order to enlarge them, thus enabling easier sliding into each other.
The mannequin is fully assembled. A few pieces of the neck broke but we fixed them with glue afterwords and it looks great. Sanding the slots proved to be ideal, although the pieces still needed to be locked with the hammer.

Laser Cutting the Skin
I removed the bio plastic sheets from the containers, and interestingly the top layer paper of the foam came off together with the bioplastic, thus giving it an interesting texture. Now I have an interesting composite material made out of bioplastic + paper (see photo on the left).
I downloaded Rhino WIP for Mac and learned how to use Grasshopper, a Rhino plugin which is operates as a graphical algorithm editor tightly integrated with Rhino’s 3-D modeling tools. First Oscar showed me the basic logic on how to make a point, then a line, then a triangle and the basic commands, then we moved on to Attractor Points, so I could create the design for the bioplastic skin of the mannequin.

With this command we place the circular surfaces at the center inside the hexagons
It was my very first time using Grasshopper, and it was a bit challenging to understand the logic behind it, especially having worked with Rhino before, but then I got it and it's quite exciting, and I can't wait to learn more :) I created a pattern with 2 attractor points, which create really interesting geometries by simply moving one or more attractor points.

I then set up the second sheet of bioplastic in the laser cutter. The 2nd sheet of paper-bio + plastic is thicker than the first ome (about 1 mm), and we placed the following settings:
LASER CUT 1
Cut
- Speed - 80
- Power - 40
Engraving
- Speed - 40
- Power - 20
ERROR!! The result was that the ellipsis weren't cut at all, and at the corners, where the curve is tighter, they were not even engraved. The engraving was subtle as well.
Overall the work lasted about 15 min.

From the left: 1. Bioplastic + Paper; 2. Bioplastic after the first laser cut, not cut; 3. Bioplastic after the second laser cut
LASER CUT 2
We changed the settings to:
Cut
- Speed - 40
- Power - 60
Engraving
- Speed - 40
- Power - 20
This time about 5% of the ellipsis were cut, and the border was cut in some parts. Still not enough , but some progress.
We intentionally left the engraving at the same settings, because we wanted to make sure it wouldn't be to strong so as to cut through the material
The job lasted about 26 min total.
LASER CUT 3
We changed the settings to:
Cut
- Speed - 20
- Power - 70
Engraving
- Speed - 50
- Power - 20
The job lasted about 35 min total. And it worked!

Bioplastic skin after the third laser cut session. Finally made it!
Here you can find a link to my working files. Enjoy!